How to Load your Backpack
Even the best backpack on the market, fit to perfection and packed well under its maximum weight capacity, can be uncomfortable if it's not loaded properly. By following a few simple rules, you can vastly improve the comfort of your pack. This article will show you how.DEMO Video.
Pack Size
First, let's start with the backpack itself. Your pack size should strike a reasonable balance between being lightweight and having the ability to carry everything you need for comfort and safety. Keep in mind that upgrading your gear to smaller, lighter items (e.g., sleeping bag and tent) can help to reduce your load and pack size. This includes the pack itself, which, even when empty, can weigh nearly 8 lbs. on the largest models.Here is a range of suggested pack sizes based on trip length:
| Pack category | Trip length | Pack capacity (liters) | Pack capacity (cubic inches) |
| Multiday | 2 to 4 days | 40 to 80 | 2,400 to 4,800 |
| Extended trip: men's | 5+ days | 80 and up | 4,700 and up |
| Extended trip: women's | 5+ days | 70 and up | 4,300 and up |
These are approximate guidelines. Your choice of pack also depends on your backpacking style (from gram-counting minimalist to someone willing to haul in comforts such as a camp chair).
Basic Packing Strategies
While internal-frame packs dominate the backpack market today, most of the strategies described here apply to any pack wearer. Fans of external-frame packs should check out our external-frame pack tips below.
Weight Distribution
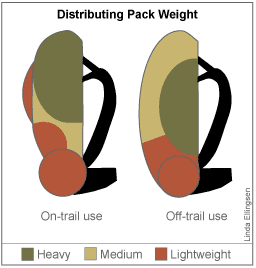
- Always put your heaviest items close to your back, centered between your shoulder blades.
- For on-trail travel, place heavy items a bit higher inside your pack. This helps focus more of the weight over your hips, the area of your body best equipped to carry a heavy load.
- For off-trail travel, place heavy items a bit lower in the main compartment. This lowers your center of gravity and increases your stability on uneven terrain.
- You are the ultimate judge of comfort. Experiment with different load arrangements to determine what feels best to you.
| Light items | Medium items | Heavy items |
| Sleeping bag | Stove | Tent |
| Pillow | Water filter | Food |
| Clothing | Canister fuel | Water |
| Foam pad | First-aid kit | Liquid fuel |
How to Get Organized
- If possible, lay out all your gear on a tarp beforehand. This makes you more aware of where things get packed plus it can help you to remember missing items.
- Stuff your sleeping bag into the bottom of your pack's main compartment first. Squeeze in any additional lightweight items you won't need until bedtime (e.g., pillowcase, sleeping shirt, but nothing aromatic).
- Cluster related small items (e.g., utensils and kitchen items) in color-coded stuff sacks to help you find them easily.
- If carrying liquid fuel, make sure your fuel bottle cap is on tightly. Pack this below your food in case of a spill.
- Don't waste empty space. For example, put a small item of clothing inside your cooking pots. Fill up your bear canister.
- Split up the weight of large communal items (e.g., tent) with others in your group if desired.
- Keep often-used items where you can easily get to them. This includes your map, compass, GPS, sunscreen, sunglasses, headlamp, bug spray, first-aid kit, snacks, rain gear and packcover.
- Tighten all compression straps to limit any load-shifting.

Other Packing Tips
Use a camera case. These can be attached to your pack's shoulder strap or hipbelt allowing for easy access to your camera. They offer protective padding; some include a built-in rain cover and storage pockets for memory cards or cleaning cloths.Carry a pack cover. Though some backpacks are made with waterproof fabric, virtually all have vulnerable seams and zippers. Any prolonged exposure to persistent rain could make the items inside your pack wet, and thus much heavier. A pack cover solves this problem.
Bring a few repair items. Wrap strips of duct tape around your water bottles or trekking poles; in case a strap pops or some other disaster occurs, a quick fix could keep you going. Take along a few safety pins in case a zipper fails.
Hydration Options
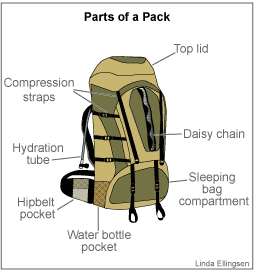
Most packs today are hydration compatible. This means they are designed to accommodate hydration reservoirs, though the reservoirs themselves are sold separately. This type of pack typically includes a pocket for the reservoir, exit ports (slits) for the tube and a small strap on each shoulder strap to route the tube through.Many older packs are NOT hydration compatible. For these packs, put your hydration reservoir close to your back (since water is heavy) and run the tube out of the top of the main compartment. Alternatively, you can place it near the top of the pack, just below the top lid. This allows gravity to work to your advantage and makes it easy to access when refilling.
Tip: To reduce the chance of leaks soaking your clothes, consider putting the reservoir inside a waterproof stuff sack (or plastic trash bag) before placing it in your pack.
The other tried-and-true hydration option is to use water bottles. Most packs offer water bottle pockets on each side of the pack where bottles can be accessed without taking your pack off.Bear Canisters
A growing number of national parks and wilderness areas now require the use of bear-resistant canisters. This policy has become necessary to reduce bears' attraction to human food and head off unwanted bear-human encounters. The requirement also acknowledges the fact that it's very difficult to successfully hang food and scented items via the traditional "bear bagging" method. (Most of us don't get it right, and Sierra bears in particular have become adept at swiping marginally positioned bags.) Bear-resistant canisters offer greater food security and convenience, but at the cost of being relatively heavy.Canister packing tips:
- Be efficient: Always fill a canister to its maximum capacity.
- Any room not occupied by food should be used for scented items such as toiletries and bug spray.
- Put your canister in the main compartment, closest to your back. If short on space, lash the canister under your top lid.
Lashing Gear to Your Pack

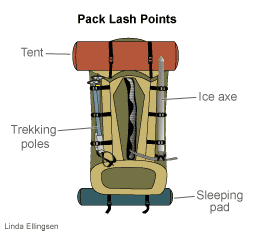
It's best to minimize the number of items you strap to the outside of your pack. Gear carried externally may adversely affect your balance. Be sure to secure any equipment you do carry outside so it doesn't swing or rattle.
Lashing tips:
- Pointy items, such as trekking poles or an ice axe, should be lashed to the outside of your pack.
- Crampons can be carried inside your pack in a protective case or lashed outside as long as you use protective point covers.
- Bulky items such as sleeping pads can be lashed outside. Use a stuff sack to protect against abrasion (especially for self-inflating pads).
- Tent poles can be lashed vertically behind the compression straps on either side of the pack, with the ends tucked into a "wand pocket" at the pack bottom.
- A daisy chain and ice axe loops are designed for specific mountaineering gear. Feel free to improvise with them, but don't get so creative that you jeopardize your comfort or stability.
Maximum Pack Weight
As a general rule, the weight of your loaded pack shouldn't exceed 25% to 30% of your ideal body weight. Some experienced backpackers may be able to carry more, while novices should generally start with less.The quality and fit of your pack influence the amount you are able to carry. A pack that does not effectively transfer weight to your hipbelt due to poor fit or design puts more weight on your shoulders (this is often the case with kids' school packs). With these packs, the maximum amount of weight you carry should be reduced to 15% or less of your body weight.
Another general rule: The heavier a pack is when empty, the more weight it is designed to carry.
External-frame Packs
This once-popular style of backpacks has become something of a niche item over the years, but external-frame packs still have their fans. A couple of tips:- Externals are recommended for on-trail travel only. Load heavier items high inside your pack and close to your body. Doing so centers the pack's weight over your hips and helps you walk in a more upright position.
- Pack your sleeping bag in its stuff sack. Finish loading your main pack bag, then strap the bag to the lash points on the bottom of the pack bag. If rain seems likely, consider stuffing your sleeping bag inside a second stuff sack or wrapping it in plastic.
Lakbay LENTE

No comments:
Post a Comment